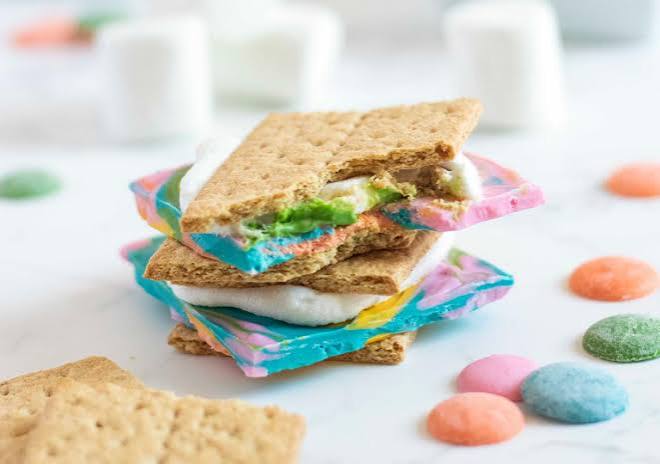
🌈 DIY Tie Dye S’mores Recipe
Looking for a fun dessert that will wow kids and adults alike? These DIY Tie Dye S’mores put a colorful twist on the classic campfire favorite. Made with gooey marshmallows, melted chocolate, crunchy graham crackers, and vibrant candy melts, these eye-catching treats are perfect for birthdays, summer parties, baby showers, holidays, or anytime you want a dessert that’s as beautiful as it is delicious.
No campfire is required! This easy recipe comes together in under 30 minutes and is a fun kitchen activity for the whole family.
Table of Contents
⭐ Why You’ll Love This Recipe
- Bright, colorful, and Instagram-worthy
- Easy to make in under 30 minutes
- No campfire needed
- Perfect for birthdays and parties
- Fun recipe to make with kids
- Easy to customize with your favorite colors
🛒 Ingredients
- 12 graham cracker squares
- 6 large marshmallows
- 6 milk chocolate squares
- 1 cup white candy melts
- Gel food coloring (pink, blue, yellow, purple, and green)
- Rainbow sprinkles (optional)
- Edible glitter (optional)
👩🍳 How to Make DIY Tie Dye S’mores
Step 1: Toast the Marshmallows
Toast the marshmallows over a campfire, stovetop, or under the oven broiler until they’re golden brown and soft.
Step 2: Assemble the S’mores
Place one chocolate square on a graham cracker. Add the warm toasted marshmallow and top with another graham cracker. Press gently until the chocolate begins to melt.
Step 3: Melt the Candy
Melt the white candy melts according to the package directions. Divide the melted candy into several small bowls.
Step 4: Create the Tie Dye Colors
Add a different gel food coloring to each bowl and stir until smooth.
Step 5: Decorate
Drizzle the colored candy melts over each s’more in a random pattern. Use a toothpick or skewer to gently swirl the colors together for a beautiful tie dye effect.
Step 6: Finish the Treats
Decorate with rainbow sprinkles or edible glitter while the candy coating is still wet. Let the candy harden for about 10–15 minutes before serving.
🔥 Tips for the Best Tie Dye S’mores
- Use gel food coloring for bright, vibrant colors.
- Don’t overmix the colors or they’ll become muddy.
- Toast marshmallows until they’re soft and gooey inside.
- Let the candy coating fully set before stacking.
- Add sprinkles immediately before the candy hardens.
- Use pastel colors for spring or bright rainbow colors for birthdays.
🍫 Fun Variations
Rainbow Tie Dye S’mores
Use every color of the rainbow and top with rainbow sprinkles.
Unicorn S’mores
Decorate with pastel pink, blue, and purple candy melts and edible glitter.
Galaxy S’mores
Use black, purple, and blue candy melts with silver sprinkles for a cosmic look.
Holiday Tie Dye S’mores
Use seasonal colors like red and green for Christmas, orange and black for Halloween, or red, white, and blue for Independence Day.
Chocolate Lover’s Version
Drizzle milk, dark, and white chocolate over the marshmallows instead of colored candy melts.
🍽️ When to Serve
These colorful treats are perfect for:
- Birthday parties
- Summer BBQs
- Family movie nights
- Baby showers
- School celebrations
- Sleepovers
- Holiday dessert tables
- Camping trips
❓ Frequently Asked Questions
Can I make these ahead of time?
Yes. Assemble and decorate them up to 2 days in advance. Store them in an airtight container at room temperature.
Can I use marshmallow fluff instead?
Yes, but toasted marshmallows provide the classic gooey s’mores texture and flavor.
How do I store leftover s’mores?
Keep them in an airtight container at room temperature for up to 3 days.
Can kids help make this recipe?
Absolutely! Kids love decorating the tie dye designs. An adult should handle the hot marshmallows and melted candy.
💡 Final Thoughts
These DIY Tie Dye S’mores are a colorful twist on the classic campfire dessert. With gooey toasted marshmallows, rich melted chocolate, crunchy graham crackers, and vibrant tie dye decorations, they’re guaranteed to be the star of any dessert table.
Whether you’re hosting a birthday party, celebrating summer, or simply looking for a creative no-bake treat, this fun recipe is easy to make, endlessly customizable, and impossible to resist. One bite, and everyone will be asking for more! 🌈🍫🔥