Easy Red Velvet Brownies: Fudgy, Rich, and Beautifully Red
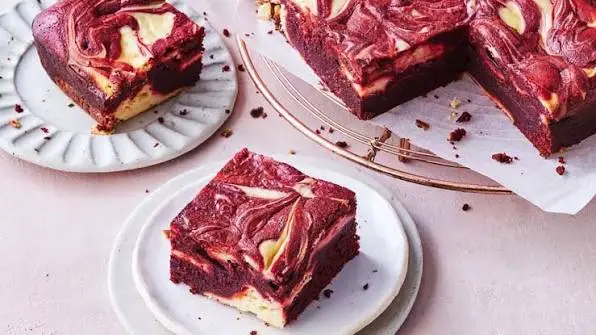
There’s something about that deep red color peeking out from under a swirl of cream cheese frosting that makes people reach for a slice before you’ve even finished setting the plate down. Red velvet has that effect, familiar enough to feel like a classic, dressed up enough to feel like an occasion. These red velvet brownies take that signature flavor and turn it into a fudgy, dense bar, easier to make than a layer cake and just as striking to look at.
Table of Contents
No layers to stack, no frosting between tiers to worry about. Just one pan, a rich chocolate-tinged batter, and a simple cream cheese swirl on top that makes these look like they came from a dedicated bakery counter.
Why You’ll Love This Red Velvet Brownies Recipe
- One bowl for the batter. No stand mixer, no multiple bowls to wash.
- Fudgy, dense texture. Closer to a brownie than a cake, with that signature red velvet tang.
- A beautiful marbled top. The cream cheese swirl looks bakery-made with almost no effort.
- Make-ahead friendly. These hold their texture well, so baking a day ahead works in your favor.
- A showstopper for holidays. That bold red color makes these a natural fit for Christmas or Valentine’s Day spreads.
Ingredients You’ll Need
Have your cream cheese fully softened before starting, since a lumpy swirl mixture won’t drag through the batter cleanly.
For the Red Velvet Brownie Batter
| Ingredient | Amount |
|---|---|
| Unsalted butter, melted | ½ cup (1 stick) |
| Granulated sugar | 1 cup |
| Eggs | 2 large |
| Vanilla extract | 1 teaspoon |
| Red food coloring | 1 tablespoon |
| All-purpose flour | ¾ cup |
| Unsweetened cocoa powder | 2 tablespoons |
| Salt | ¼ teaspoon |
| White vinegar | 1 teaspoon |
For the Cream Cheese Swirl
| Ingredient | Amount |
|---|---|
| Cream cheese, softened | 4 oz |
| Granulated sugar | ¼ cup |
| Egg yolk | 1 large |
| Vanilla extract | ½ teaspoon |
How to Make Red Velvet Brownies
Work through the batter first, then mix the cream cheese swirl while the brownie base comes together in the pan.
Step 1: Prep the Pan and Oven
Preheat your oven to 350°F. Line an 8×8-inch pan with parchment paper, leaving an overhang on two sides for easy removal later.
Step 2: Mix the Wet Ingredients
Whisk the melted butter and sugar together in a large bowl until combined. Add the eggs one at a time, then stir in the vanilla and red food coloring until the mixture turns a deep, even red.
Step 3: Add the Dry Ingredients
Fold in the flour, cocoa powder, and salt, stirring just until no streaks of flour remain. Stir in the white vinegar last; this small addition is part of what gives red velvet its signature tang. Pour the batter into your prepared pan and spread evenly.
Step 4: Make the Cream Cheese Swirl
Beat the softened cream cheese and sugar together until smooth. Add the egg yolk and vanilla, mixing until fully combined and creamy.
Step 5: Swirl and Bake
Dollop spoonfuls of the cream cheese mixture evenly over the brownie batter, then drag a knife or skewer through in loose figure-eight motions to create a marbled swirl. Bake for 28 to 32 minutes, until a toothpick inserted in the brownie portion comes out with a few moist crumbs, not wet batter.
Pro tip: Don’t overswirl. A few confident drags of the knife give you a beautiful marbled effect, while too much stirring blends the colors together and mutes that bakery-style look.
Step 6: Cool Before Slicing
Let the brownies cool completely in the pan, about an hour, before lifting them out with the parchment overhang. They firm up significantly as they cool, so slicing too early gives you a gooier, less clean cut.
For the cleanest slices, refrigerate the fully cooled brownies for 30 minutes before cutting, then use a knife wiped clean between cuts.
Nutritional Information (Per Serving)
Based on a batch cut into 16 bars. Values are approximate and will vary based on exact brands used.
| Nutrient | Amount |
|---|---|
| Calories | 195 |
| Total Fat | 10g |
| Saturated Fat | 6g |
| Carbohydrates | 24g |
| Sugar | 17g |
| Protein | 3g |
How to Store Red Velvet Brownies
Because of the cream cheese swirl, these hold up best with a little refrigeration, even though the base is a sturdy brownie.
- Room temperature: Up to 1 day in an airtight container.
- Refrigerator: Up to 5 days in an airtight container, which keeps the cream cheese swirl at its best.
- Freezer: Wrap individual bars tightly, then place in a freezer bag for up to 2 months.
- Thawing: Move to the fridge overnight, or let sit at room temperature for about an hour before serving.
Frequently Asked Questions
Why does this red velvet brownies recipe call for vinegar?
The vinegar reacts with the cocoa powder and enhances the reddish color while adding a subtle tang, which is part of what makes red velvet taste distinct from a regular chocolate dessert. It’s a small amount, so it won’t make the batter taste sour.
Can I use gel food coloring instead of liquid for this red velvet brownies recipe?
Yes, and gel often gives a more vibrant color with less liquid added to the batter. Start with about half the amount called for, since gel coloring is more concentrated, then adjust until you reach the color you want.
Why did the swirl in my red velvet brownies sink or disappear?
This usually happens if the cream cheese mixture is too thin, or if the knife drags too many times through the batter. Make sure the cream cheese is well beaten but not runny, and use a light hand when swirling.
Can I make red velvet brownies ahead of time?
Yes. These hold their texture well overnight in the fridge, and the flavor settles nicely after a day of chilling. That makes them an easy make-ahead option for holidays or gatherings.
Ready to Bake?
These red velvet brownies bring together everything people love about red velvet in a form that’s easier to pull off than a full cake: fudgy texture, that signature tang, and a marbled cream cheese swirl that looks far more complicated than it actually is. They’re a natural fit for holiday tables but simple enough to make any week the craving hits. Give this recipe a try, and if you make a batch, snap a photo and tag it so others can see how yours turned out.